Inventory transfers enable you to move inventory between two Jetpack warehouses or from Jetpack to an external facility like Amazon. These transfers help provide faster shipping options and reduce costs, and are subject to standard shipping, receiving fees, and service level agreements.
Inventory Transfers Overview
Transferring inventory between fulfillment centers allows you to optimize your distribution network and improve delivery times. The process involves creating a Warehouse Receiving Order (WRO) at your destination facility, then submitting a B2B order to ship the inventory from your origin location.International Transfer Requirements
For inventory transfers to fulfillment centers outside of the United States, you will need to provide:| Requirement | Details |
|---|---|
| Prepaid Label | Must include DDP (Delivered Duty Paid) service |
| Freight Arrangement | Pre-arranged freight with a customs broker |
| Commercial Invoice | Must indicate that you are the Importer of Record A template for this invoice is available from Jetpack Care |
Step 1: Create a Warehouse Receiving Order (WRO)
Creating a WRO is the first step because you’ll need to upload the box labels to your B2B order later.Creating Your Transfer WRO
Navigate to Receiving > Receiving Orders
From the Jetpack dashboard, click Receiving on the left-hand side, then select Receiving Orders.
Start the WRO creation process
Click the blue Send Inventory button to begin creating your Warehouse Receiving Order.
Select destination fulfillment center
Choose the Jetpack warehouse or hub you are sending inventory to. Optionally, insert a Purchase Order number (PO#).
Add products to transfer
Begin typing the name of each product and select it from the search results. Enter the quantity to send for each product.Optionally, mark any product as a lot/dangerous good and check the confirmation box if applicable.
Choose your shipping method
Select from the following options based on your transfer type:
| Shipping Method | Configuration | Details |
|---|---|---|
| Parcel | Configure the B2B order as Parcel |
|
| Palletized Container or Less than Truckload (LTL) | Configure the B2B order as Freight |
|
| Floor Loaded Container | Also configure as Freight |
|
Verify shipping address and arrival date
Review the shipping address to ensure it matches the receiving fulfillment center. Enter the estimated date of arrival (calculate 10 business days from the current date/local time of the receiving center).Optionally, upload your Bill of Lading (BOL) if applicable (this appears only for freight configurations).
Submit Receiving Order
Review all details and click Submit Receiving Order. Confirm the submission when prompted.
Download the box labels
After submission, download the box labels for later upload to your B2B order. These labels must be attached to each parcel or pallet.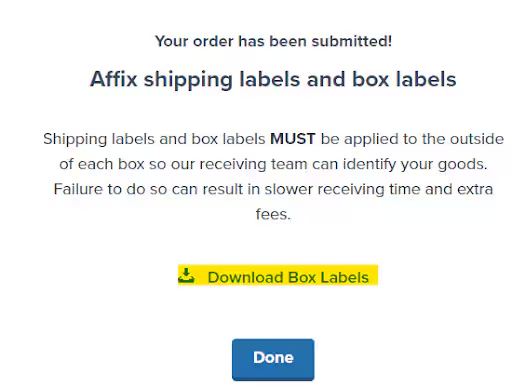
Step 2: Submit a B2B Order
Once your WRO is complete, create a B2B order to prep the inventory for shipment.Navigate to Orders > All Orders
From the Jetpack dashboard, click Orders on the left-hand side, then All Orders.

Complete recipient information
Complete the order details, ensuring that details reflect the same information as your WRO:
| Transfer Location | Contact Information to Provide |
|---|---|
| Within the United States |
|
| Outside the United States |
|
Add packing instructions and upload WRO labels
In the Special Instructions for packing and assembly field, copy and paste the text below, customizing the parts specific to your transfer:Upload the box labels downloaded during the WRO process by clicking Other Attachment.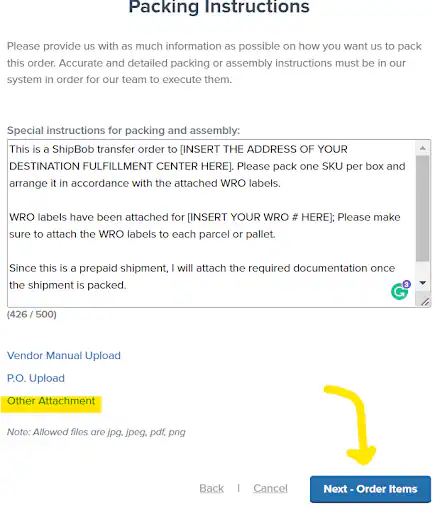
Select origin fulfillment center
Select the fulfillment center from which you are transferring inventory.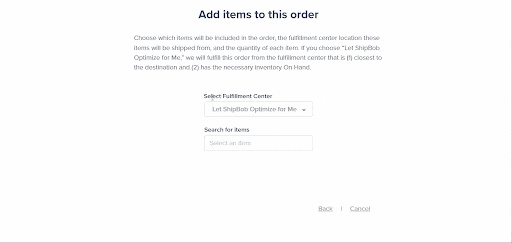
B2B Order Information and Requirements
After submitting your B2B transfer order, monitor its progress and ensure you meet all requirements for successful processing.Monitoring Your Transfer Order
Ensure that your shipment is in Processing status and address any On-Hold or Exception issues promptly.| Label/Freight Type | Requirements |
|---|---|
| ShipBob Labels or Arranged Freight | No additional attachments or appointments are needed |
| Prepaid Labels or Freight |
|
Scheduling and Editing Restrictions
For those arranging their own freight pickup or drop-off, please schedule appointments with Jetpack’s inbound team.Once a shipment has been picked, you cannot edit the products or units within it. Any changes to the shipping method should be communicated using the chat feature in your Jetpack dashboard or submit a case to Jetpack Care.
Let’s Dive Deeper
Inventory Overview
Back to the main inventory management guide
Creating a WRO
Create Warehouse Receiving Orders for inventory shipments
Managing WROs
Track and monitor your Warehouse Receiving Orders
B2B Fulfillment
Learn about B2B orders and fulfillment options
MultiHub IQ
Automated inventory distribution across fulfillment centers
Inventory Distribution
Analyze optimal inventory placement strategies

Questions? Contact Jetpack Care.
If you have any questions or run into issues with inventory transfers, you can always contact Jetpack Care for help. Our team is always here to assist via Slack, phone, or email!