Exporting your order data lets you analyze fulfillment metrics, maintain records, share information with your team, and integrate Jetpack data with your business intelligence tools. You can export up to a million lines of order data at once, with dozens of data fields including products, tracking, timestamps, costs, and customer information.
Export Overview
Jetpack allows you to export orders as a.csv file from the Orders page. You can choose to export specific orders, all orders on the current page, or all orders based on your applied filters.
Key Export Capabilities
- Export up to 1 million lines of data in a single download
- Expanded column options including Order Tags, Ship Option, Sales Channel Store, Store Shipping Method, and SKU
- Export specific orders, current page, or all filtered results
- All dates and timestamps in UTC time for consistency
Data Retention
Orders in Shipped status are available on the Orders page for 14 months from the ship date. After 14 months, orders are deleted from the Jetpack dashboard. To retrieve data for shipped orders older than 14 months, contact Jetpack Care via the chat feature in your dashboard.How to Export Orders
Navigate to the Orders page
From the Jetpack dashboard, click Orders on the left-hand navigation bar, then select All Orders from the menu options.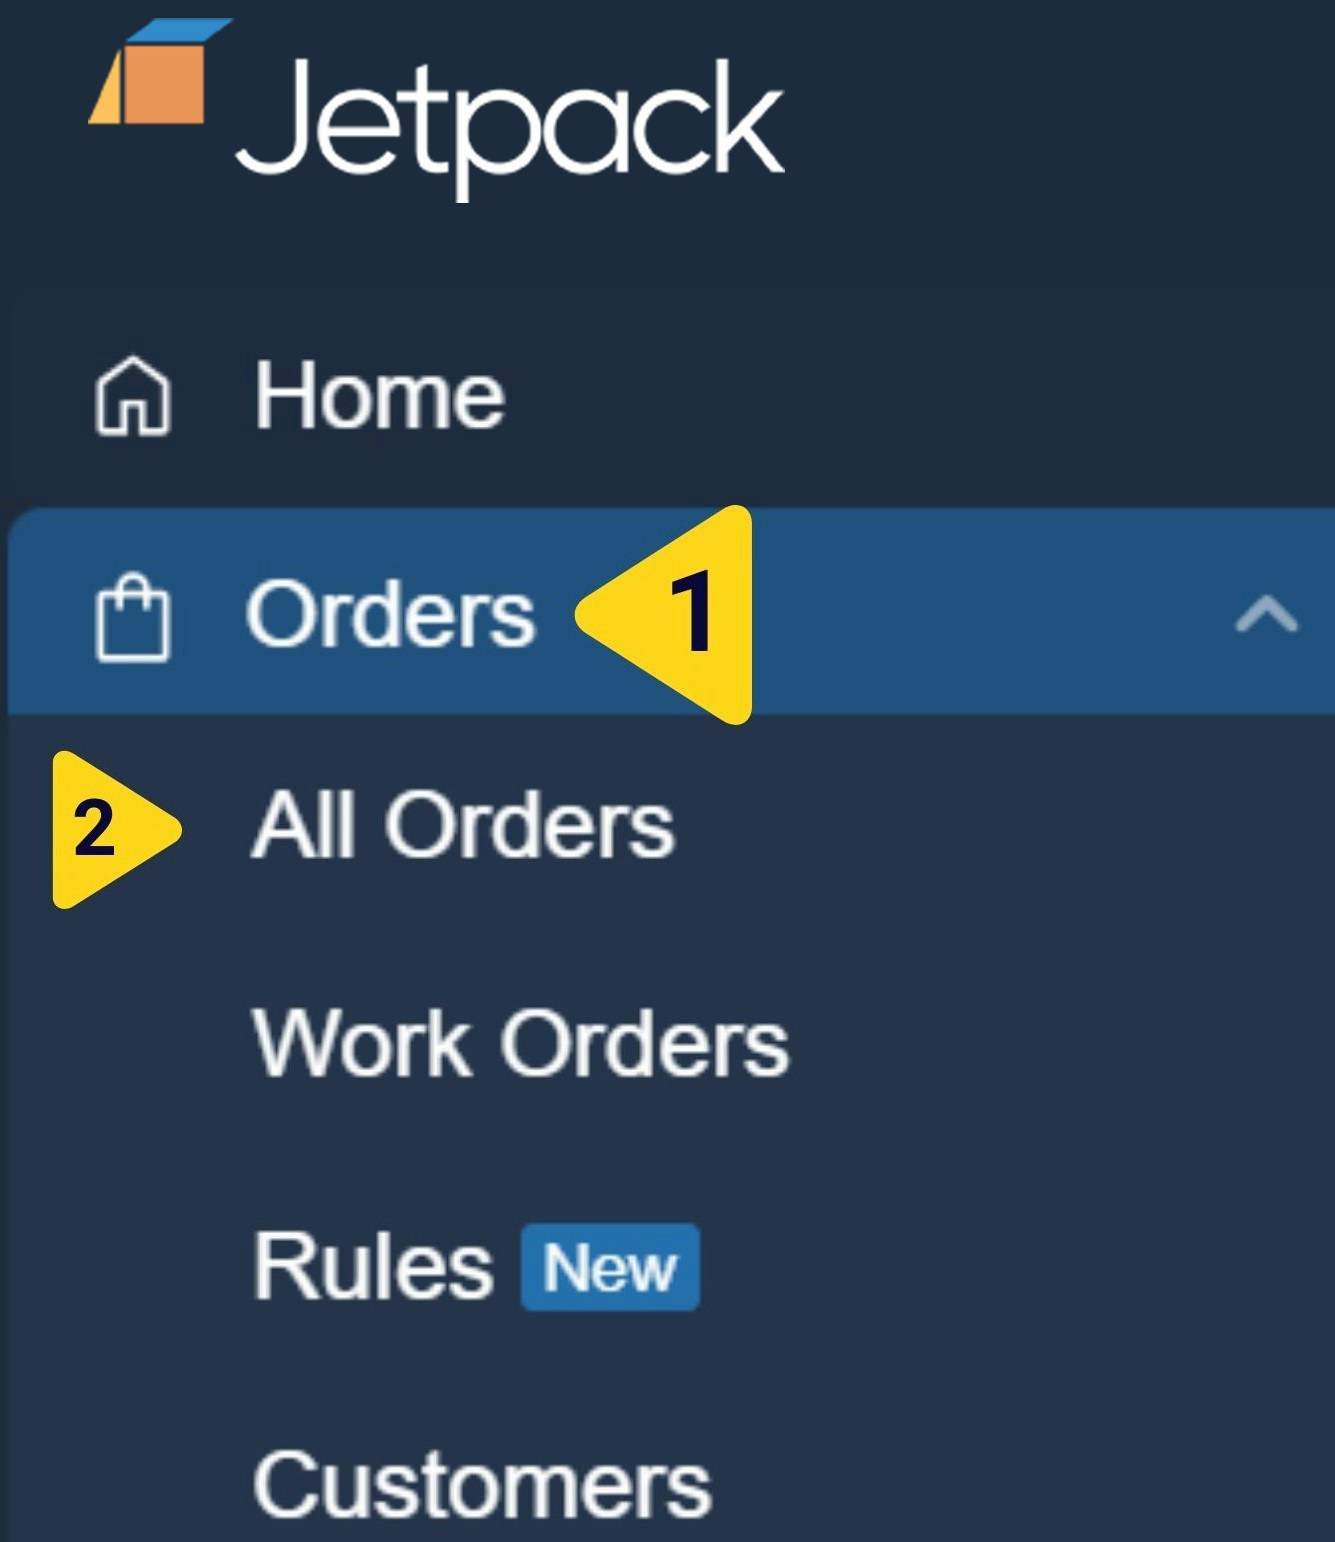
Apply filters or select orders to export
You have two options for choosing which orders to export:Option 1: Apply filters to display specific orders
- Click the funnel icon to open the filter panel on the right side of the page
- Select filter categories from the left side (e.g., Import Date, Fulfillment Center, Order Status)
- Choose your filter criteria from the right side of the panel
- Click Apply Filters to view matching orders
- Check the boxes next to specific orders you want to export
- Or check the box in the column header to select all orders on the current page
Open the Actions menu
After applying filters or selecting orders, click the Actions button. Then select Export To Excel from the dropdown menu.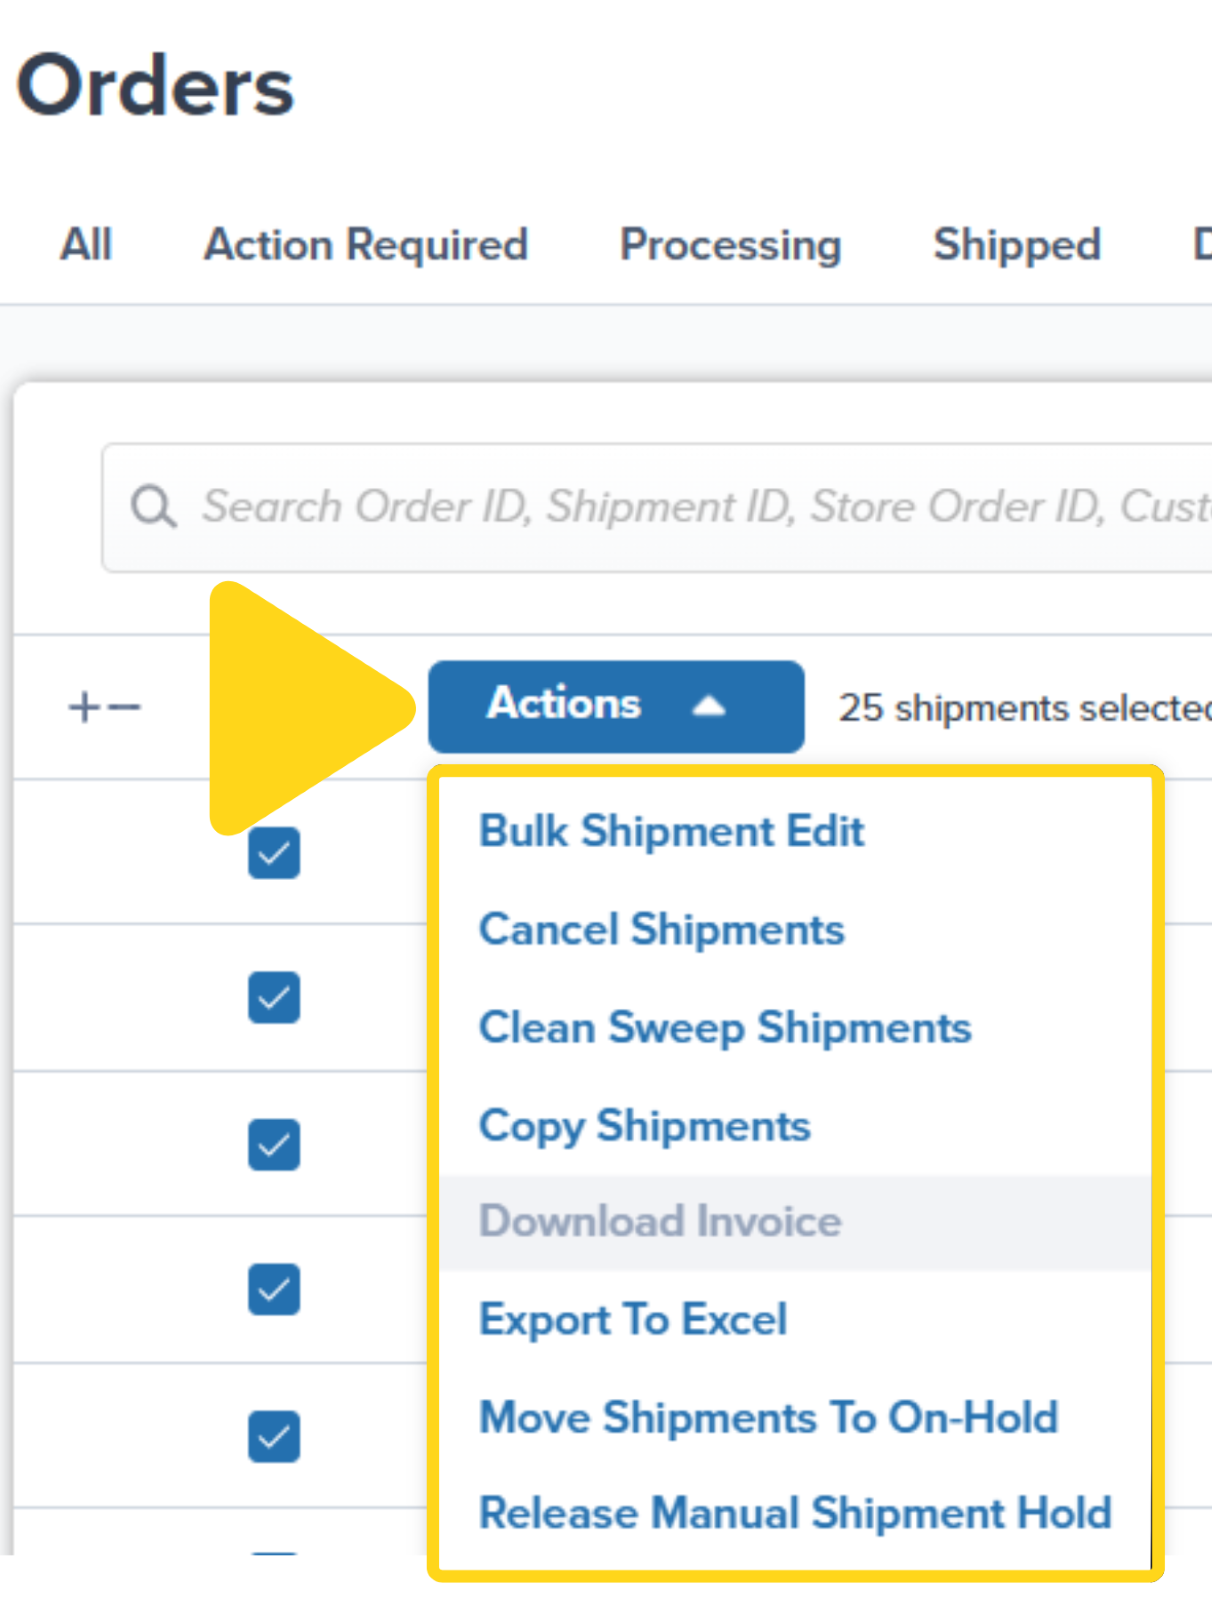
Choose your export scope
In the popup window, select one of the following options: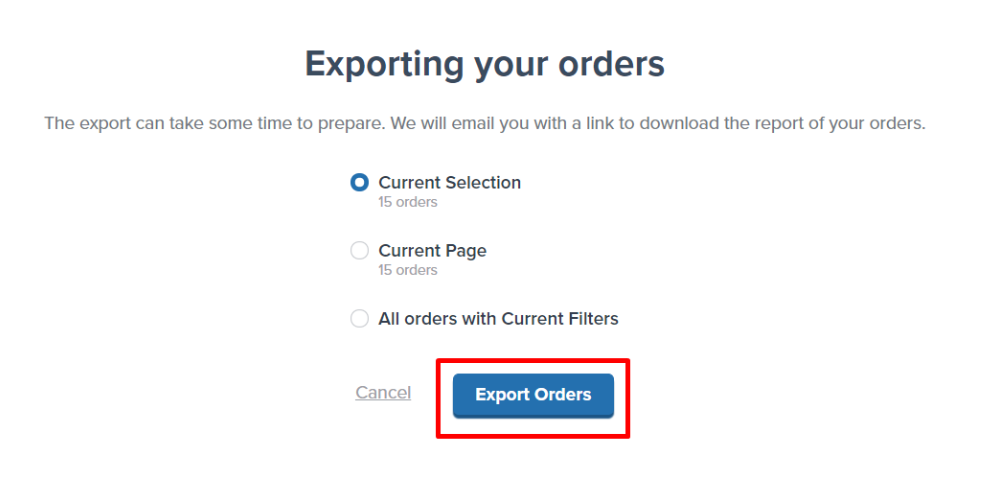
- Current Selection - Only the orders you checked
- Current Page - All orders visible on the current page
- All Orders with Current Filters - All orders matching your filters (across all pages)
Receiving Your Export
Jetpack will send you an email with the subject line “Export of your orders.” The email contains a download link that’s valid for 24 hours.Download the CSV file
Click the hyperlink starting with OrdersExport. The 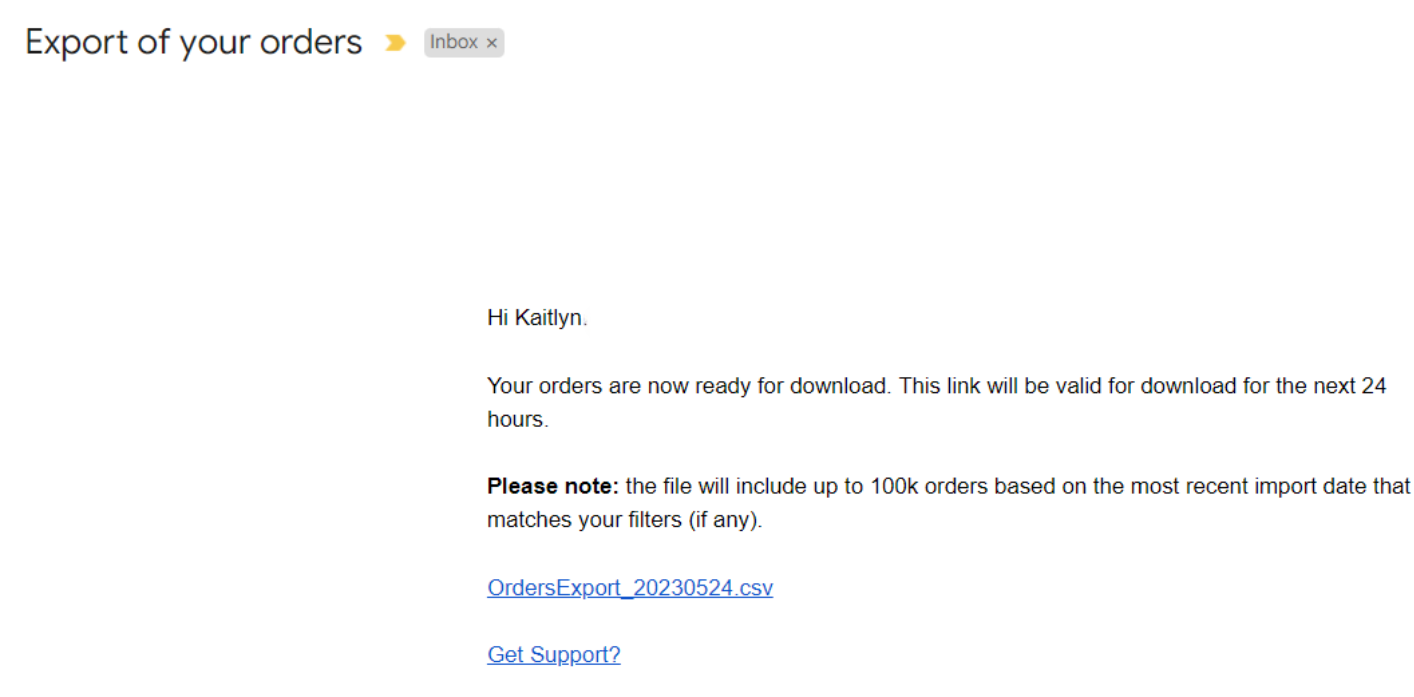
.csv file will download to your computer.Understanding Your CSV Export
Your exported CSV file contains comprehensive order data across multiple columns. Here’s what each column represents:Order Identification
| Column | What It Contains |
|---|---|
| Shipment ID | Unique number assigned in the Jetpack dashboard |
| Store Order ID | Unique number from your ecommerce store integration (blank if manually created or missing from Excel upload) |
Dates and Timestamps
Note: All dates and timestamps are in UTC time.| Column | What It Contains |
|---|---|
| Import Date | UTC date/time when the order was imported (for non-integrated orders, this is the dashboard creation date) |
| Purchase Date | Date the customer placed the order (blank if manually created or uploaded via Excel) |
| Ship Date | UTC date/time when the order was shipped |
| Delivery Date | Date the order was delivered |
| Order Processed Timestamp | UTC date/time when the order entered Processing (blank if in Action Required or On-Hold) |
| Picked Timestamp | UTC date/time when picking began (blank if not yet picked) |
| Packed Timestamp | UTC date/time when the order was packed (blank if not yet packed) |
| Labeled Timestamp | UTC date/time when the order was labeled (blank if not yet labeled) |
Customer Information
| Column | What It Contains |
|---|---|
| Customer Name | Recipient’s name |
| Customer Email | Recipient’s email address |
| Shipping Address1 | Recipient’s street address |
| Shipping Address2 | Recipient’s unit number (if applicable) |
| Shipping Company | Company receiving the order (B2B orders only) |
| Shipping City | Delivery city |
| Shipping Zip | Delivery zip/postcode |
| Shipping State | Delivery state |
| Shipping Country | Delivery country |
| Shipping Phone | Recipient’s phone number |
Order Source and Processing
| Column | What It Contains |
|---|---|
| Source | Method used to import or create the order (e.g., Shopify) |
| Order Status | Current status (e.g., Processing, On-Hold, Exception) at the time of export |
| Created By | Jetpack user’s name who created the order (for manual orders) |
| ShipBob Batch Id | Batch ID for orders picked together in bulk |
| Notes | Log of systematic changes (e.g., if an order was copied or split) |
Shipping and Tracking
| Column | What It Contains |
|---|---|
| Carrier | Assigned carrier (displays as “Prepaid Freight/Parcel” for prepaid B2B orders; blank if not yet labeled) |
| Tracking Information | Carrier tracking number (blank if not yet labeled) |
| Delivery Status | Carrier’s delivery status (blank if in transit) |
| Last Message | Carrier delivery note (e.g., “Delivered: Side door”) |
Package Details
| Column | What It Contains |
|---|---|
| Length | Exterior packaging length in inches (blank if not packed) |
| Height | Exterior packaging height in inches (blank if not packed) |
| Width | Exterior packaging width in inches (blank if not packed) |
| Actual Weight | Total order weight in pounds including products and packaging (blank if not packed) |
| Shipping Zone | Zone based on distance from the fulfillment center (blank for prepaid orders or if not invoiced) |
Product Information
Note: A single order may span multiple rows if it contains more than one unique product.| Column | What It Contains |
|---|---|
| Line Item ShipBob Id | Jetpack Inventory ID for the product(s) |
| Line Item Name | Product name as listed in the dashboard |
| Line Item Qty | Quantity picked for the product |
| Total Item Quantity | Total number of items (all SKUs) in the order |
| Serial Numbers | Scanned serial number during packing (blank unless configured) |
| Lot Number | Lot number for the unit (blank unless configured as a lot product) |
| Expiration Date | Expiration date for the unit (blank unless configured as a lot product) |
Fulfillment Details
| Column | What It Contains |
|---|---|
| Fulfillment Center | Jetpack fulfillment center that shipped the order |
| Fulfillment Cost | Total cost charged for order fulfillment (shows 0 if unfulfilled) |
| Invoice ID | Billing order number (blank if not invoiced) |
| Insurance Value | Total insurance purchased in the local currency |
| Reserve Date | Date selected to reserve inventory for a B2B order (manual orders only) |
| Ship By Date | Same as Reserve Date |
SLA and Fulfillment Metrics
| Column | What It Contains |
|---|---|
| SLA Status | Fulfillment SLA status: AwaitingInventoryAllocation, AwaitingReset, PendingOnTime, FulfilledOnTime, PendingLate, FulfilledLate |
| Estimated Fulfillment Date | Estimated packing date based on SLAs (subject to updates) |
| Fulfillment Date | Actual packing date (blank if not yet packed) |
Formatting the CSV in Excel
To ensure that tracking numbers and other numeric fields are formatted correctly in Excel, follow these steps to prevent Excel from automatically converting tracking numbers to scientific notation or removing leading zeros.Access the Data import menu
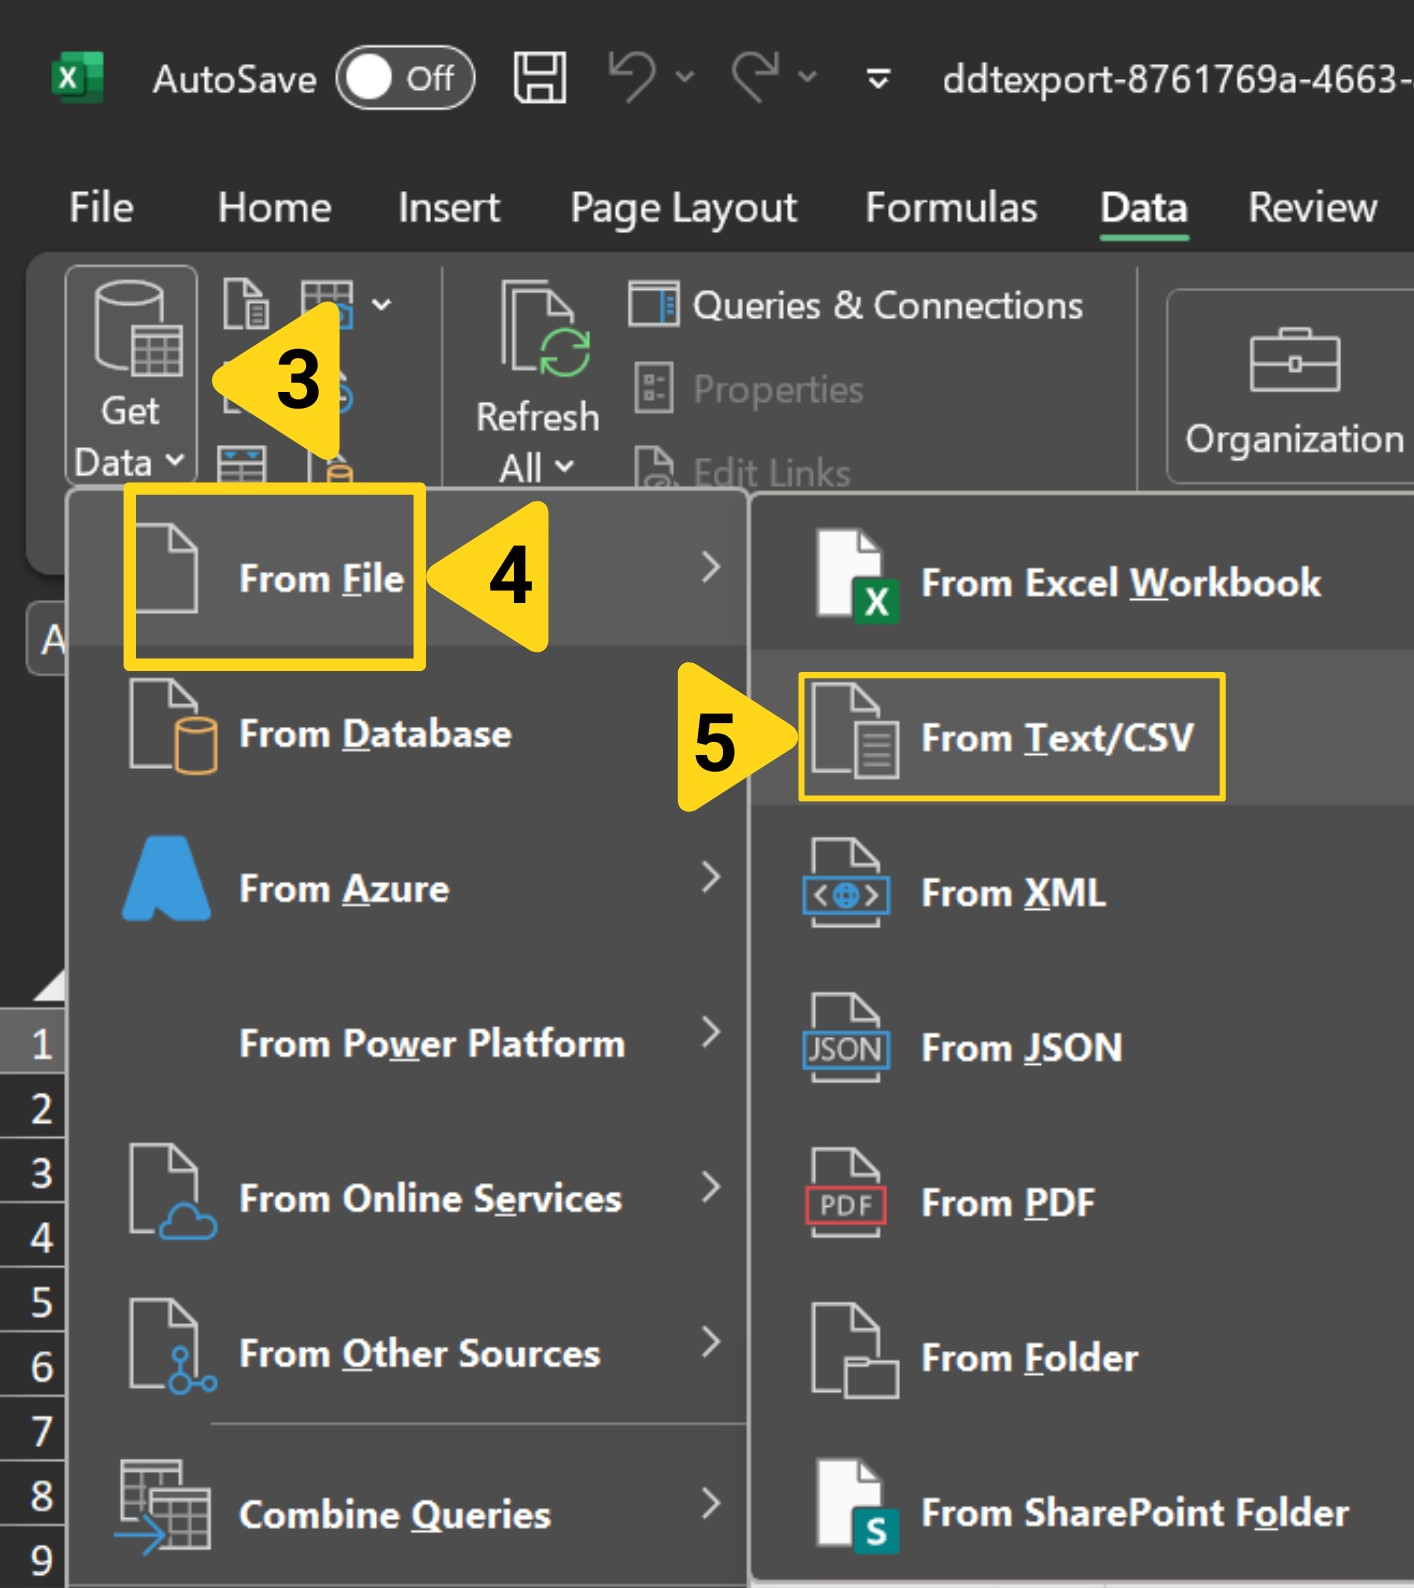
Click Data in the top navigation bar, then select Get Data and hover over From File.
Configure data type detection
In the import preview window, under Data Type Detection, select Do not detect data types.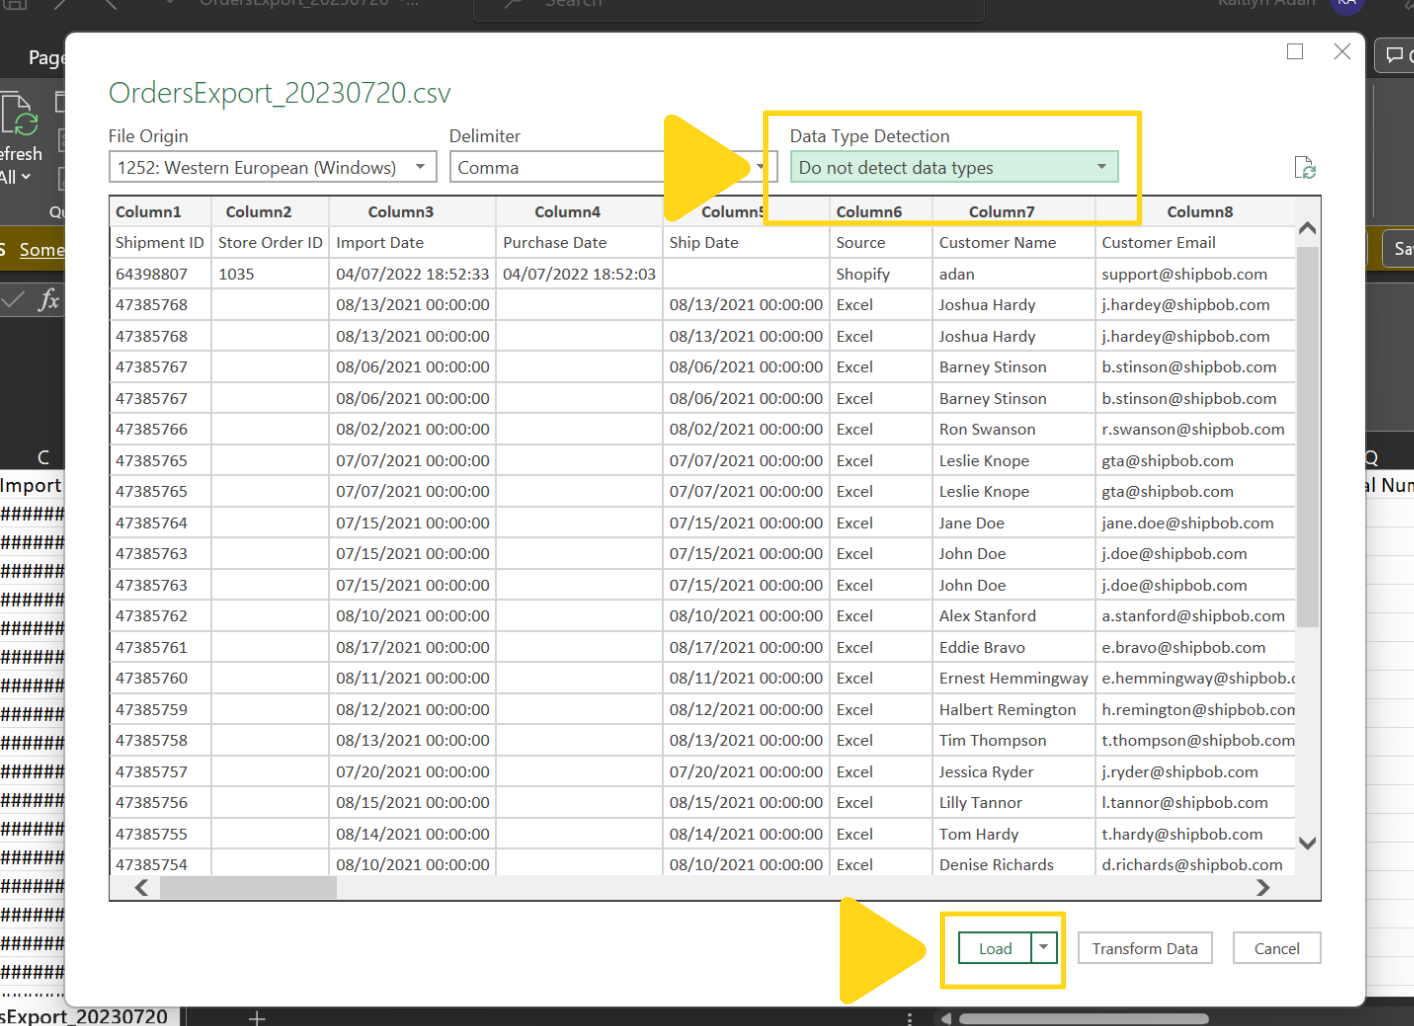
CSV Export FAQs
Why are some columns blank in my export?
Why are some columns blank in my export?
Columns may be blank if the relevant data is unavailable at the time of export:
- Tracking Information is blank if the order hasn’t been labeled yet
- Delivery Date is blank if the order hasn’t been delivered
- Package dimensions (Length, Width, Height, Actual Weight) are blank if the order hasn’t been packed
- Store Order ID is blank if the order was manually created or missing from an Excel upload
- Purchase Date is blank if the order was manually created
Why does a single order appear on multiple rows?
Why does a single order appear on multiple rows?
If an order contains more than one unique product, it will span multiple rows in the CSV export. Each row represents one product SKU.Example: An order with 2 different products will have:
- Row 1: Product A with its quantity
- Row 2: Product B with its quantity
Can I schedule automatic exports?
Can I schedule automatic exports?
Automatic scheduled exports are not currently available through the dashboard. However, you can:
- Use the ShipBob API to pull order data programmatically
- Contact Jetpack Care to discuss custom reporting solutions for your business needs
What's the difference between Import Date and Purchase Date?
What's the difference between Import Date and Purchase Date?
Purchase Date is the date the customer placed the order in your ecommerce store (e.g., Shopify, WooCommerce). This comes from your integration.Import Date is the date/time the order was imported into Jetpack. For integrated stores, this is typically within minutes of the Purchase Date. For manually created orders, Purchase Date is blank and Import Date is the dashboard creation date.Use Purchase Date for customer-facing reports and analytics.
Use Import Date for Jetpack fulfillment timeline analysis.
How can I export only orders from a specific fulfillment center?
How can I export only orders from a specific fulfillment center?
To export orders from a specific fulfillment center:Your export will include only orders processed by that fulfillment center.
Open the filter panel
On the Orders page, click the funnel icon to open the filter panel on the right side of the page.
Select the Fulfillment Center filter
Click Fulfillment Center from the filter categories on the left side. Then check the box next to your desired FC (e.g., Chicago, Los Angeles, Pennsylvania) on the right side.
Can I export order data older than 14 months?
Can I export order data older than 14 months?
Orders in Shipped status are removed from the dashboard after 14 months. If you need historical data older than 14 months, contact Jetpack Care via chat or submit a case.Best practice: Export your order data quarterly or monthly to maintain long-term records without relying on dashboard retention limits.
Let’s Dive Deeper
The Orders Page
Navigate and filter all your orders with customizable views
D2C Turnaround Times + SLAs
Understand SLA statuses in your export
Order Status Overview
Learn about order statuses appearing in exports
Tracking Packages
View tracking information for shipped orders
Bulk Actions on Orders
Efficiently manage orders before exporting
Shipment Details Page
View complete order information and history

Questions? Contact Jetpack Care.
If you have any questions or run into issues, you can always contact Jetpack Care for help. Our team is always here to assist via Slack, phone, or email!