This guide explains how to create FBA freight/LTL shipments using Jetpack’s Business order flow. The legacy Amazon FBA prep shipment creation flow may no longer be available, so this workflow uses the standard Business order creation process with special instructions for Amazon’s LTL requirements.
Legacy vs. New Amazon Flow
The legacy Amazon FBA prep shipment creation flow may no longer be available in your Jetpack dashboard. If it is still accessible, you can continue using it as detailed in the Manual FBA Prep with Jetpack guide. The workflow below outlines how to create FBA freight/LTL shipments using the new Amazon flow, which follows the standard Business order creation process with Amazon-specific requirements.Creating an FBA Freight/LTL Shipment
By following these structured steps, you can effectively create an FBA freight/LTL shipment using Jetpack’s Business order flow, ensuring that all shipping details, special instructions, and product requirements are correctly processed.Navigate to Orders and select Business order type
From the Jetpack dashboard, click Orders in the left-hand navigation, then click New Order and select Business.
Enter recipient information
Search through your saved contacts or create a new contact for Amazon. Include a Company field if applicable.Since the Amazon shipment location is provided later in the process, enter a dummy address for now.
If you wish to use Jetpack freight services, submit a request with Jetpack Care before proceeding.
Configure shipping label payment
Decide how you would like to pay for the shipping label:
- If you purchase your own label: You will be notified after the order is packed
- For Jetpack’s network of carriers: Select Jetpack Buys to have the order automatically shipped and billed to your account
Enter packaging instructions
When prompted for packaging instructions, include the following text in the form field:Required instructions:
“For freight, Amazon FBA orders have a 1500lb weight limit per pallet. Carton and pallet labels will be provided.”If creating a prepaid freight order, add:
“We will also provide the BOL.”
Select fulfillment center
Choose a specific fulfillment center from the drop-down list, or select Let Jetpack optimize for me to have Jetpack automatically select the optimal FC based on your inventory location and order requirements.
Add products to your order
Use the search field to add items to your order. Enter the total number of units you wish to ship in the Quantity column for each product.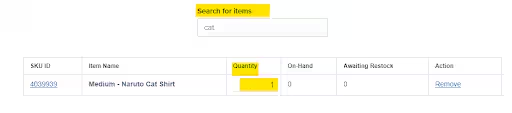
Add special instructions for FBA packing
Copy and paste the following text in the special instructions box: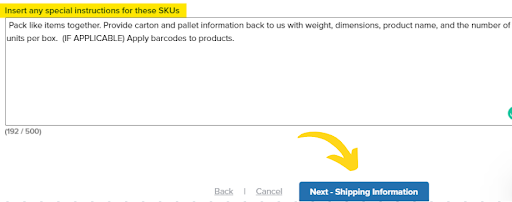
“Pack like items together. Provide carton and pallet information back to us with weight, dimensions, product name, and the number of units per box.”Optional: Barcoding ProductsIf you want Jetpack to apply barcodes to your products, include text like:
“Apply barcodes to products: Barcode number [BARCODE NUMBER/SKU] product [PRODUCT NAME]”
Make sure to update the ASIN and FNSKU fields in the Jetpack dashboard for each product you’re sending to Amazon. This ensures accurate tracking and identification in Amazon’s fulfillment network.
Set reserve date and finalize order
Click Next - Shipping Information and select a reserve date for your inventory. Orders will be processed based on the reserve date.Review the SLA for FBA prep orders to understand processing timelines.Click Next to review your order details, then click Create Order to place the order.If the reserve date is met, the order moves to processing quickly. Otherwise, it remains on hold until the reserve date arrives.
Post-Order Steps
After Jetpack picks and packs your order, you will receive carton and pallet information. Next, go to Amazon Seller Central to initiate an inbound shipment.Generate labels in Amazon Seller Central
Navigate to Amazon Seller Central to create your inbound shipment.For shipments to one location:
Generate box and pallet labels in Amazon Seller Central based on the carton and pallet information provided by Jetpack, then download the labels.For shipments to multiple locations:
To consolidate inventory into a single shipment, disable the Amazon Inventory Placement service in Seller Central. This allows you to send all inventory to one Amazon FC instead of splitting across multiple locations. Then generate labels for the single consolidated shipment.
Upload labels to your Jetpack order
Once you’ve generated the necessary labels in Amazon Seller Central:
- Return to your order in the Jetpack dashboard
- Upload box and pallet labels as Other attachment type
- For shipments using Amazon freight, upload the Bill of Lading (BOL) under the BOL attachment section
Let’s Dive Deeper
Amazon FBA with Jetpack
Overview of FBA fulfillment options
Creating Automated FBA Shipments
Set up automated FBA prep workflows
Manual FBA Prep
Alternative FBA prep workflow (legacy flow)
Creating Manual B2B Orders
General Business order creation guide
B2B Turnaround Times
Review SLAs for FBA and B2B orders
Upload Order Attachments
Learn about uploading documents to orders

Questions? Contact Jetpack Care.
If you have any questions or run into issues with FBA freight shipments, you can always contact Jetpack Care for help. Our team is always here to assist via Slack, phone, or email!