
Prerequisites
Before connecting your Shopify store, ensure you have:- An active Shopify store (works with both standard Shopify and Shopify Plus accounts)
- A Jetpack merchant account with access to your dashboard
Connecting Shopify to Jetpack
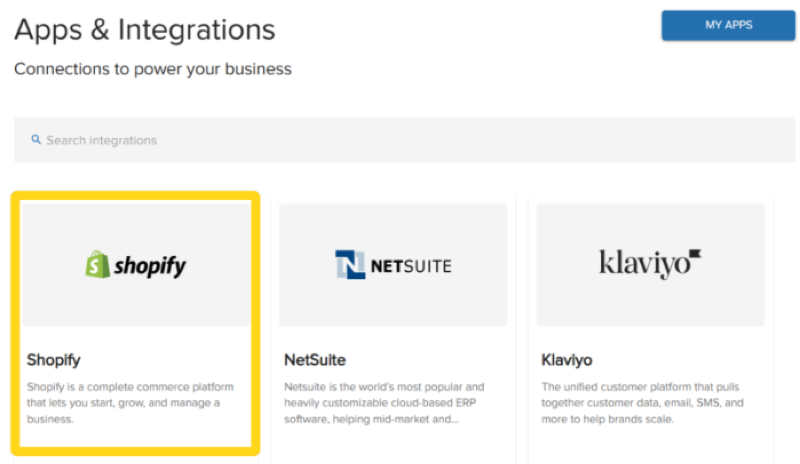
Follow these steps to install and configure the Shopify integration from your Jetpack dashboard:Navigate to Integrations
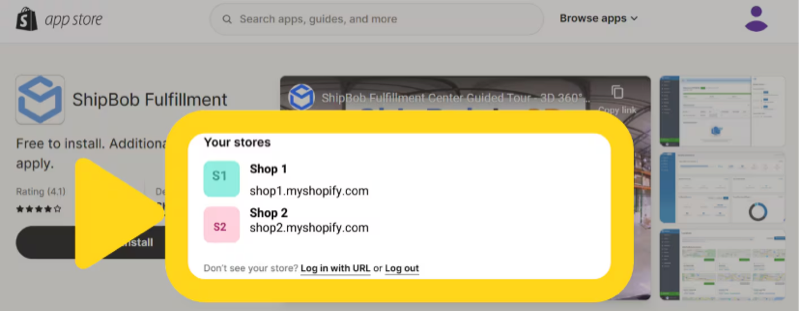
Connect Shopify
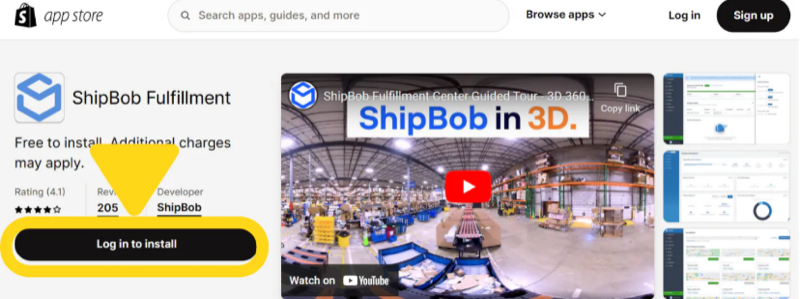
Review and install
Setting Up Shopify Fulfillment Locations
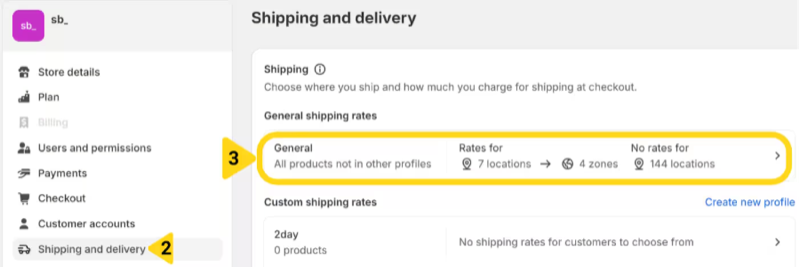
After connecting your Shopify store, you need to ensure that Jetpack appears as a fulfillment location in your Shopify shipping settings. This step is crucial for proper order routing and fulfillment.Verifying Your Fulfillment Service in Shopify
Once integrated, Jetpack creates a fulfillment service identifier in Shopify (e.g., “ShipBobFulfillment-XXXXX”). You’ll need to verify this location appears in your Shopify shipping settings. From your Shopify admin: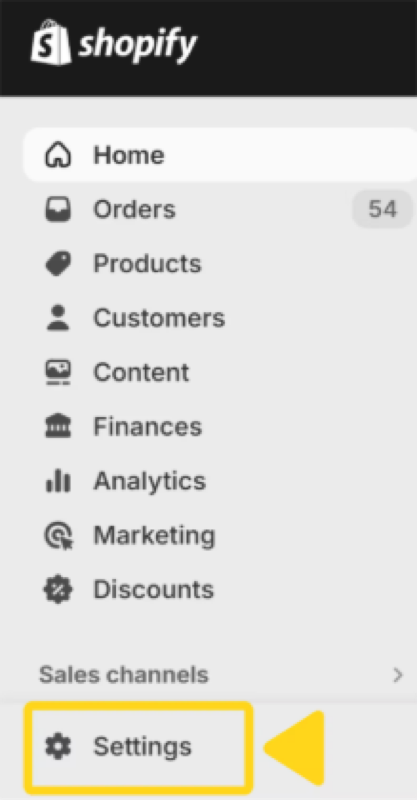
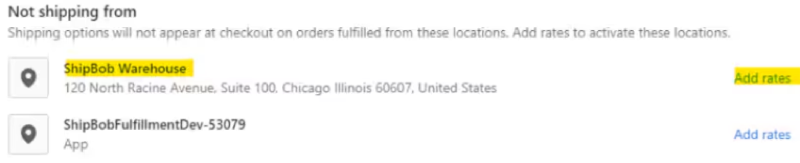
Adding Rates for Jetpack Fulfillment (If Not Listed)
If you don’t see your ShipBobFulfillment-XXXXX location in the Shipping origins section:Click Add rates next to the ShipBobFulfillment-XXXXX location
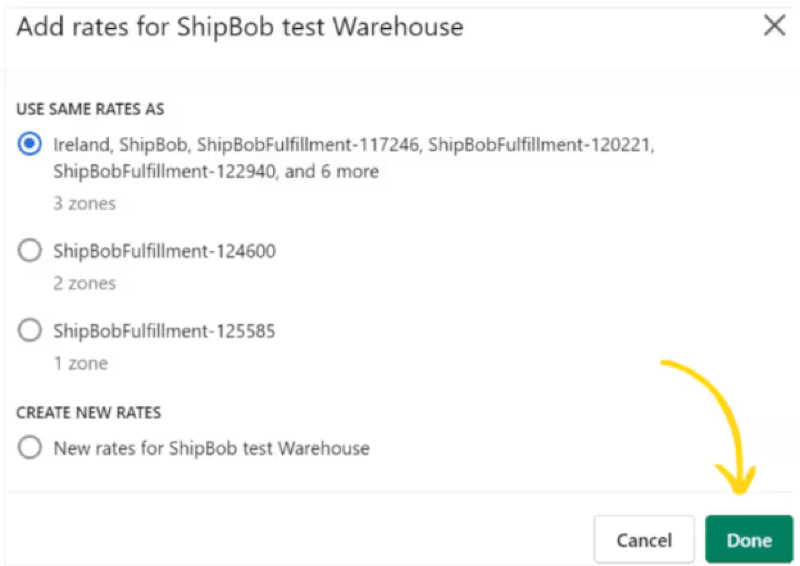
Select the desired shipping rates configuration
- Use same rates as: Select an existing location to copy its rate structure
- Create new rates: Define custom rates for this fulfillment location
Post-Integration Configuration
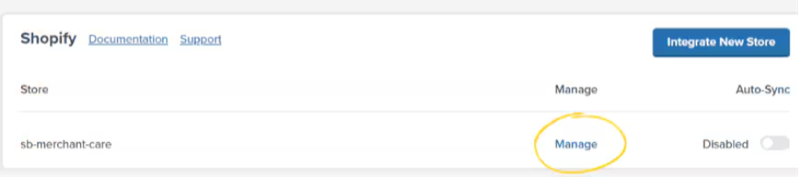
After successfully connecting Shopify, you’ll need to configure several integration settings in your Jetpack dashboard. These settings control how products, orders, and inventory sync between platforms.Accessing Integration Settings
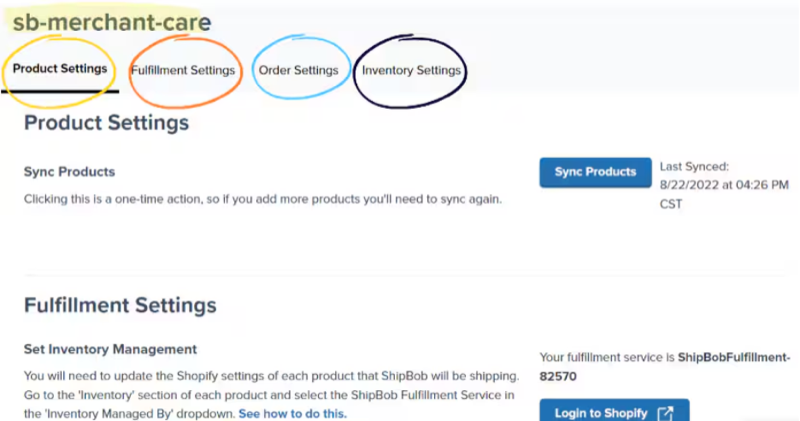
Product Settings
Sync Products: Click the Sync Products button to import your existing Shopify products into Jetpack’s Product Catalog.- This is a one-time action during initial setup
- Jetpack creates an inventory ID for each product and imports product images
- Products in any status (Draft or Active) will be imported
- If you add new products to Shopify later, click Sync Products again to import them
- Jetpack uses Shopify’s variant ID as the unique identifier to match products
- Each product variant (e.g., different sizes or colors) syncs as a separate product in Jetpack
- The parent product structure doesn’t sync—only the individual variants
- Changes to product name, image, or SKU in Shopify require manually clicking Sync Products again in Jetpack
Fulfillment Settings
Set Inventory Management: You must configure which products Jetpack will fulfill by updating the “Inventory Managed By” setting in Shopify. For each product/variant that Jetpack will ship:Under Inventory Managed By, select the ShipBob fulfillment service from the dropdown
Choose how Jeptack handles orders

- All Items: Jetpack will ship all items regardless of fulfillment service assignment
- ShipBob Assigned: Jetpack will only ship items whose fulfillment service is ShipBob
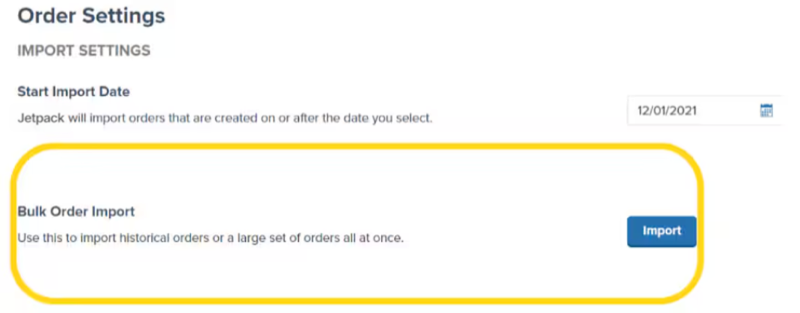
Order Settings
Start Import Date: Select the date from which Jetpack should begin importing Shopify orders.- Can be set up to 120 days in the past
- Can be set to a future date
- Required if using Auto-Sync or Bulk Order Import
- Useful for migrating from another fulfillment provider
- Imports orders in bulk rather than waiting for automatic sync
- Can also be accessed from the Orders page under Actions
- Paid Only: Imports only orders marked as “Paid” or “Unfulfilled” in Shopify
- Paid, Authorized & Processing: Imports orders in “Paid,” “Authorized,” “Processing,” or “Unfulfilled” status
- Orders import but don’t automatically enter fulfillment
- You must manually release orders from hold status
- Useful for quality control or fraud review
Sync Settings
Auto-Sync: Enable Auto-Sync to automatically import orders from Shopify to Jetpack in real-time.- Orders sync within minutes of being placed
- Starts the SLA clock immediately upon import
- Highly recommended for most merchants
- Delay range: 30 minutes to 24 hours
- Requires Auto-Sync to be enabled
- Useful if you need time to validate orders or process refunds before fulfillment begins
Inventory Settings
Inventory Count Syncing (Optional): Enable this to allow Jetpack to update inventory levels back to Shopify automatically.- Syncs every 5 minutes without manual intervention
- Updates inventory for both individual products and bundles
- Jetpack syncs the “sellable” inventory count (fulfillable quantity minus exceptions)
- When inventory reaches this value, Shopify displays “0 in stock”
- Example: Set buffer to 5, and Shopify shows out of stock when Jetpack inventory drops to 5 units
- Only available when Inventory Count Syncing is enabled
Configuring Ship Option Mapping
Before Jetpack can fulfill your Shopify orders, you must map your Shopify shipping methods to Jetpack ship options. This ensures that the shipping method your customer selects at checkout matches the corresponding fulfillment service in your Jetpack dashboard. Learn how to configure Ship Option Mapping here.What Syncs Automatically
After connecting your Shopify store, Jetpack automatically handles product syncing, order importing, inventory updates, and fulfillment notifications.Product Syncing
What syncs:- All published products in your Shopify store sync to Jetpack’s Product Catalog
- Product details including name, SKU, barcode, weight, and dimensions
- Product images for easy identification in the dashboard
Order Importing
Orders placed in your Shopify store are imported to Jetpack for fulfillment within 15 minutes. Jetpack checks for new orders every few minutes to ensure prompt processing. What syncs:- Customer name and shipping address
- Products and quantities
- Shipping method selected at checkout
- Order notes and gift messages
- Order number (mapped to Jetpack Reference ID)
- Draft orders (only paid, confirmed orders are imported)
- Archived orders
- Orders marked as fulfilled by other fulfillment services
Inventory Syncing
Jetpack syncs available inventory quantities from fulfillment centers back to Shopify, ensuring your store always reflects accurate stock levels. Sync triggers:- Receiving new inventory at Jetpack fulfillment centers
- Fulfilling orders
- Processing inventory adjustments
- Moving products between fulfillment centers
- Restocking returned items
- On Hand: Total physical units at Jetpack
- Committed: Units allocated to pending orders
- Backordered: Units promised to orders but not yet received
- Unavailable: Units marked as damaged or quarantined
- Primary method: Shopify SKU ↔ Jetpack Inventory ID
- Fallback method: Shopify Barcode ↔ Jetpack Barcode
Multi-Location Inventory
If you use Shopify’s multi-location inventory feature, Jetpack can sync inventory to a specific Shopify location instead of updating global inventory levels. To configure multi-location syncing:- In your Shopify admin, create a location named “ShipBob” (or another descriptive name)
- Contact Jetpack Care and provide your Shopify location name
- Jetpack will configure the integration to sync inventory to that specific location
Tracking Numbers and Fulfillment
When Jetpack ships an order from a fulfillment center, the following occurs automatically:- Tracking number syncs to your Shopify order
- Order is marked as fulfilled in Shopify using Shopify’s fulfillment service API
- Shopify sends a fulfillment notification email to your customer with the tracking link
- Tracking updates become visible in Shopify admin and the customer’s account
- Each shipment is marked as a partial fulfillment in Shopify
- Each tracking number is added to the order details
- Customers receive separate email notifications for each shipment
Gift Messages and Order Notes
Jetpack imports both gift messages and order notes from Shopify, ensuring special customer requests are fulfilled accurately. Gift Messages:- Sync from Shopify to Jetpack automatically
- Appear on the packing slip included with the order
- Must be entered in Shopify’s designated gift message field (not in order notes) to appear on the packing slip
- Sync to Jetpack and are visible in the order details
- Available to fulfillment center staff during order processing
- Can include special handling instructions or customer requests
Advanced Features and Capabilities
Partial Fulfillment by Location or Product
You can choose to fulfill some orders yourself while sending others to Jetpack. In Shopify, assign specific products or order locations to Jetpack as the fulfillment service, and any products not assigned to Jetpack will not be sent for fulfillment. To configure partial fulfillment:- In your Shopify admin, navigate to Settings > Apps and sales channels
- Click ShipBob
- Under Fulfillment, select which products or locations should use Jetpack
- Save your changes
Product Bundles
Jetpack supports Shopify bundles, allowing you to sell product kits or sets that ship together. Bundles must be configured in your Jetpack dashboard with their component products. Jetpack calculates available bundle quantities based on the lowest available component quantity and syncs that number to Shopify.Subscriptions and Recurring Orders
Jetpack integrates seamlessly with Shopify subscription apps. Subscription orders sync to Jetpack like standard orders and are fulfilled according to their recurring schedule.Shopify POS Orders
Orders placed through Shopify’s Point of Sale (POS) system sync to Jetpack and are fulfilled like standard online orders, provided they meet the criteria for import (confirmed, paid, and assigned to Jetpack for fulfillment).B2B Wholesale Orders
Jetpack can fulfill both direct-to-consumer (B2C) and wholesale (B2B) orders from your Shopify store. B2C orders: Standard Shopify orders shipped to end customers B2B orders: Wholesale orders shipped to retailers or distributors To identify B2B orders and apply custom fulfillment rules, add a tag in Shopify (e.g., “Wholesale”) and contact Jetpack Care to configure B2B order processing based on tags. Learn more about B2B fulfillment options.Supported Shopify Features
| Feature | Supported |
|---|---|
| Multi-location inventory | Yes (requires configuration with Jetpack Care) |
| Multiple Shopify stores | Yes (each store connects separately) |
| Gift messages | Yes |
| Order notes | Yes |
| Product variants | Yes |
| Bundles | Yes (requires setup in Jetpack) |
| Subscriptions | Yes |
| Draft orders | No (must be confirmed and paid) |
| Shopify POS | Yes (orders sync like standard orders) |
| Shopify Plus | Yes (same integration process) |
Managing Out-of-Stock Products
If a product is out of stock at Jetpack, the order will be placed on hold in your Jetpack dashboard until inventory is received. Jetpack does not prevent customers from ordering out-of-stock items in Shopify—you must manage available inventory quantities and stock visibility in your Shopify admin. To avoid orders being placed for out-of-stock products, ensure your inventory syncing is configured correctly and consider using Shopify’s inventory management features to hide or mark products as unavailable when quantities reach zero.Editing Orders After Import
Limited edits can be made to orders in the Jetpack dashboard before they are picked and packed. Once imported from Shopify, you can update:- Shipping address
- Shipping method
- Add products (if inventory is available)
- Cancel the order
Returns Processing
Jetpack does not automatically create return orders in Shopify. Returns must be managed manually or through a returns management integration. Manual Returns Process:- Create the return order in Jetpack manually or via the Jetpack API
- Once processed and restocked, manually mark the order as returned or refunded in your Shopify admin
Using ShipBob 2-Day Express with Shopify
ShipBob 2-Day Express is a premium shipping service that guarantees delivery within two business days. You can offer this service to your Shopify customers by setting it up as a shipping method in Shopify and mapping it to the ShipBob 2-Day Express ship option in your Jetpack dashboard.Using ShipStation with Shopify and Jetpack
If you currently use ShipStation as middleware between your Shopify store and fulfillment operations, you can continue using this workflow with Jetpack. For complete setup instructions, see the Shopify and ShipStation Integration Guide.Shopify Integration FAQs
When are Shopify orders imported to Jetpack?
When are Shopify orders imported to Jetpack?
How are orders marked as fulfilled in Shopify?
How are orders marked as fulfilled in Shopify?
How often does inventory sync from Jetpack to Shopify?
How often does inventory sync from Jetpack to Shopify?
Can I use Jetpack with Shopify Plus?
Can I use Jetpack with Shopify Plus?
Can I fulfill some orders myself and send others to Jetpack?
Can I fulfill some orders myself and send others to Jetpack?
- In Shopify admin, navigate to Settings > Apps and sales channels
- Click ShipBob
- Under Fulfillment, select which products or locations should use Jetpack
- Save your changes
What happens if a product is out of stock at Jetpack?
What happens if a product is out of stock at Jetpack?
Can I edit orders after they're imported to Jetpack?
Can I edit orders after they're imported to Jetpack?
- Shipping address
- Shipping method
- Add products (if inventory is available)
- Cancel the order
How do I disconnect Shopify from Jetpack?
How do I disconnect Shopify from Jetpack?
- Navigate to Settings > Integrations
- Locate Shopify
- Click the three-dot menu and select Disconnect
- Confirm the disconnection
Can I turn off inventory syncing?
Can I turn off inventory syncing?
What happens if I manually adjust inventory in Shopify?
What happens if I manually adjust inventory in Shopify?
How do I sync inventory for bundled products?
How do I sync inventory for bundled products?
Disconnecting Shopify from Jetpack
If you need to disconnect your Shopify store from Jetpack:- Navigate to Settings > Integrations in your Jetpack dashboard
- Locate Shopify in your connected integrations
- Click the three-dot menu and select Disconnect
- Confirm the disconnection when prompted
Let’s Dive Deeper
Store Integration Overview
Shopify and ShipStation
Importing Shopify B2B Orders
Managing Products
Ship Option Mapping
Syncing Products

Questions? Contact Jetpack Care.
If you have any questions or run into issues during setup, you can always contact Jetpack Care for help. Our team is always here to assist via Slack, phone, or email!